DIY septic riser installation involves digging down to your septic tank's access port, sealing a structural PVC or polyethylene high-density pipe to the tank opening, and securing it with a weather-tight lid at ground level. For most Sacramento homeowners, this project can be completed in a single afternoon with a few basic tools and a septic tank riser kit.
Tired of digging up your lawn every time your tank needs a pump-out or an inspection? Leaving your septic access buried doesn't just kill your grass—it adds significant labor costs to every service visit and can delay help during an emergency backup. By installing a riser, you bring that access point to the surface, protecting your landscaping and ensuring your system is always accessible for routine maintenance.
In this guide, we’ll walk you through the exact tools you need, the safety precautions required for working around septic gases, and a clear process for achieving a professional-grade seal. You’ll finish this article knowing exactly how to upgrade your system and whether this DIY project fits your skill set.
Let’s start with the preparation phase to ensure you have the right materials for your specific tank.
Why You Should Consider Septic Tank Riser Installation
A septic riser is a waterproof, vertical pipe made of heavy-duty plastic or concrete that extends from the access port of your buried septic tank up to ground level. Its primary purpose is to eliminate the need for excavation during routine maintenance. Instead of a technician digging a hole in your yard to find the tank, they simply unscrew a reinforced lid at the surface. For many homeowners, a septic tank riser kit is the most practical upgrade you can make to an aging system.
In the Sacramento region, many older septic systems remain "buried," requiring significant labor to locate and uncover. Septic riser installation matters because it directly impacts your long-term maintenance costs and system safety. When a tank is buried two or three feet deep, property owners often delay essential pumping because they don't want to tear up their lawn or pay the extra "probing and digging" fees. This delay is exactly what leads to preventable backups and expensive drain field failures. By installing septic risers, you ensure that tank locating and outlet baffle replacement can be performed quickly and accurately.
The Practical Benefits of Surface Access
- Cost Savings: You eliminate digging fees from your septic service bill forever.
- Landscaping Protection: No more unsightly dirt mounds or dead grass patches every three to five years.
- Emergency Readiness: If your system fails during a storm, a riser allows for immediate access without searching for a lid under mud or standing water.
- Safety: Modern lids are designed to be secondary-containment secure, keeping children and pets safe from accidental falls into the tank.
A common mistake is assuming that any plastic pipe will work for a septic tank riser diy project. However, using non-rated materials can lead to structural collapse or groundwater leaking into your tank—which can actually flood your system. Choosing the right materials is the first step toward a successful installation.
How to Install a Septic Tank Riser: A Step-by-Step DIY Guide
Successfully installing septic tank riser components requires a balance of physical labor and careful sealing techniques. The goal is to create a watertight extension from your tank to the surface that can withstand soil pressure and prevent "surface water intrusion"—which is when rain or runoff leaks into your tank and overloads your leach field. Following a structured process ensures your septic tank riser diy project adds value to your home rather than creating a leak.
If you find that your tank is buried deeper than five feet or if you notice cracks in the concrete around the access port, we recommend pausing the DIY route. In these cases, professional septic riser and lid installation is safer to ensure structural integrity. However, for standard depths, the following steps will guide you through the process.
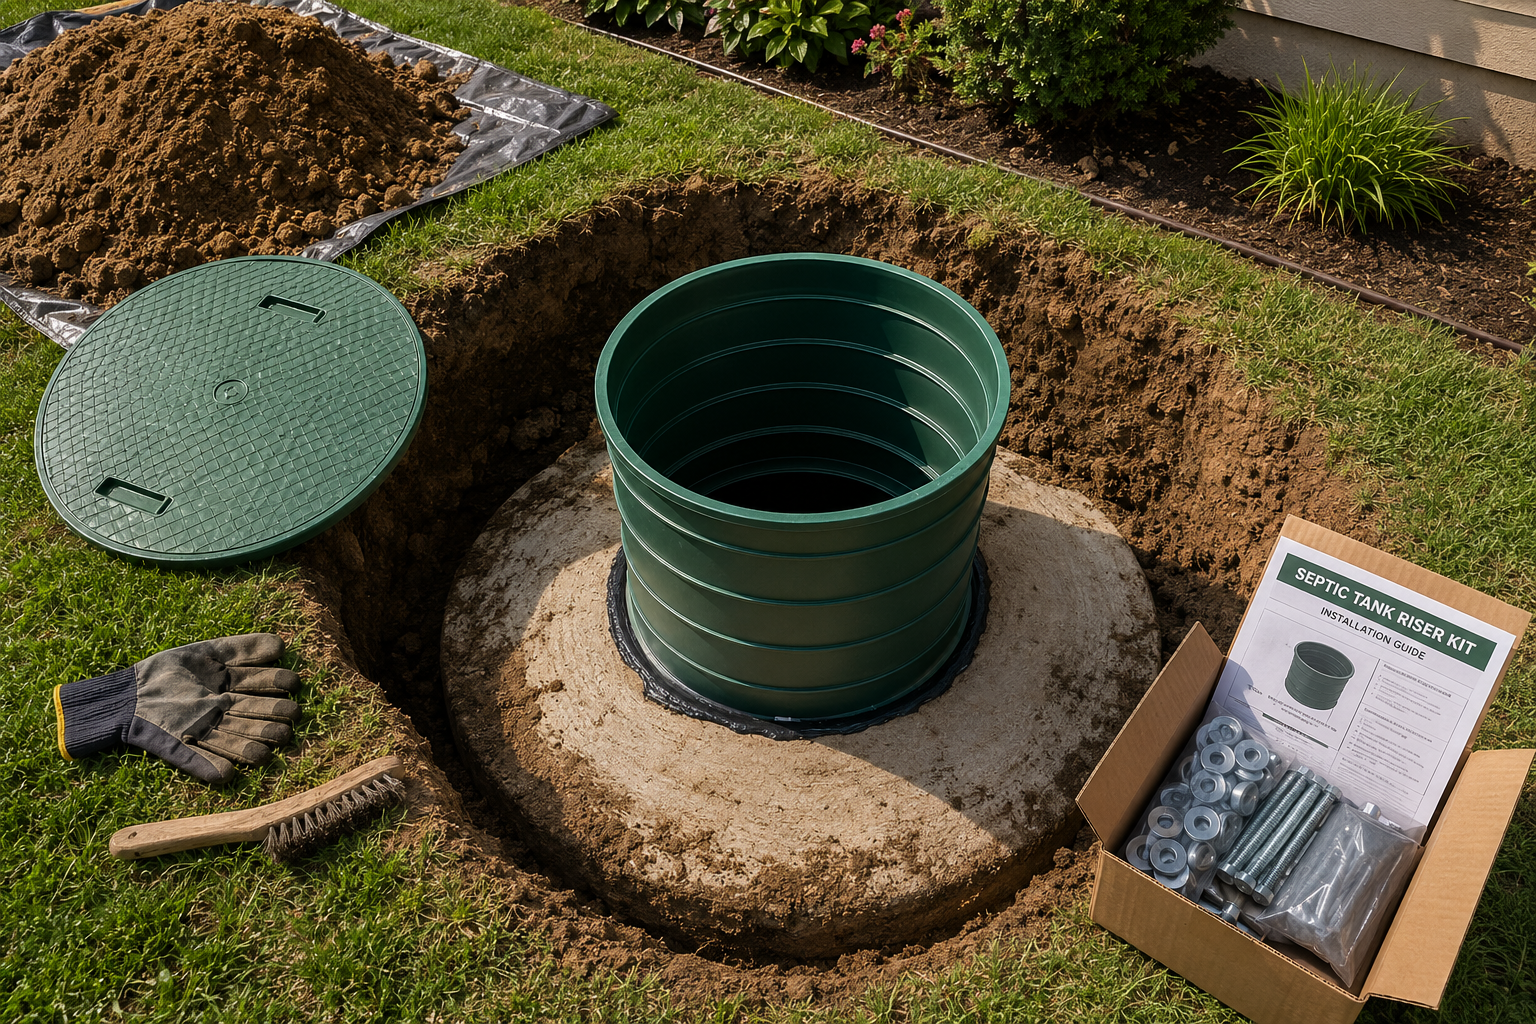
Step 1: Locating and Uncovering the Access Port
Before you can begin installing septic risers, you must find the exact location of the tank's main clean-out cover. If you don't have a map of your system, you can often find it by looking for the main sewer line exiting your home and probing the soil with a thin metal rod.
Once located, dig a hole approximately 6–12 inches wider than the tank lid. This extra space is crucial for cleaning the concrete surface, which is necessary for a proper seal. Dig until the entire concrete "shoulder" around the lid is exposed.
Step 2: Cleaning the Mounting Surface
This is the most overlooked step in how to install septic risers. Use a wire brush and a scraper to remove every bit of dirt, roots, and debris from the concrete area where the riser base will sit. If the surface is wet or muddy, dry it as much as possible. A sealant will not bond to a dirty or saturated surface, and a failed seal at the base allows groundwater to enter your system, which may eventually require emergency septic pumping.
Step 3: Choosing and Measuring Your Riser Kit
Most modern septic tank riser and lid kits are made of corrugated plastic or PVC and come in various diameters (usually 12, 18, or 24 inches). Measure the diameter of your tank's opening to ensure the riser base covers it completely.
- Measure the Depth: Place a straight edge across the top of your hole at ground level and measure down to the tank surface.
- Cut to Size: Most risers are stackable or can be cut with a handsaw. Aim for the top of the riser to sit about 1–2 inches above the final grade of your lawn to prevent lawnmower damage while keeping surface water out.
Step 4: Applying the Sealant and Securing the Base
Apply a thick bead of heavy-duty butyl rubber sealant or specialized "septic mastic" to the bottom of the riser base or the cleaned concrete surface.
- Set the Base: Press the riser base firmly into the sealant.
- Anchor it: Most kits include masonry anchors. Drill pilot holes into the concrete tank and drive the anchors through the base flange. This prevents the riser from "floating" or shifting when the soil settles.
- Seal the Joints: If you are stacking multiple riser sections, apply sealant between every joint.
Step 5: Backfilling and Installing the Safety Lid
Carefully shovel soil back around the riser in 6-inch layers, tamping the dirt down as you go. This prevents the riser from shifting. Be careful not to hit the riser with the shovel or heavy machinery during this process.
Finally, attach the heavy-duty lid. Modern lids usually include a foam gasket and stainless steel screws. Ensure the lid is fastened tightly to prevent unauthorized access. A secure lid is your final line of defense against odors and accidental falls.
Pro Tip: Before you backfill completely, wait 24 hours for the sealant to cure, then pour a little water around the base of the riser to check for immediate leaks. It’s much easier to fix a seal now than it is to dig it up again in six months.
Real-World Scenarios: DIY Septic Riser Installation in Practice
Moving from the technical steps to real-world application helps clarify why this project is such a high-value upgrade for your property. Here is how installing septic risers typically plays out for different Sacramento homeowners.
- The Proactive Homeowner: A family in Elk Grove grew tired of their lawn being dug up every three years for routine service. By purchasing a septic tank riser and lid kit and following a DIY weekend plan, they brought their access to the surface. The outcome was a permanent end to excavation fees and a perfectly preserved backyard during their next septic tank cleaning and pumping appointment.
- The Real Estate Seller: A homeowner in Roseville was preparing for a real estate septic inspection. To ensure the inspector had immediate access and to increase the home's "maintenance-friendly" appeal, they completed a septic riser installation before listing. This small investment removed a potential hurdle for buyers and demonstrated that the system had been meticulously cared for.
- The Emergency Saver: After a heavy storm caused slow drains, a Granite Bay resident struggled to find their buried lid in the mud. After the emergency was resolved, they installed a riser to ensure that any future troubleshooting could happen instantly, without the need for specialized locating equipment.
These examples show that whether you are looking for long-term convenience or preparing for a sale, a riser is a practical solution that any handy homeowner can implement.
Expert Tips for a Successful Septic Riser DIY Project
Applying these professional insights can be the difference between a permanent solution and a leaky mess. While how to install a septic tank riser seems straightforward, these small adjustments ensure your system remains protected for decades.
- Always Use Grade-A Butyl Sealant: Avoid standard hardware store silicone. For a truly watertight septic riser installation, you need thick, rope-style butyl rubber or mastic. This material remains flexible over time, allowing the riser to expand and contract with the soil without breaking the seal.
- Install a Safety Barrier: If your riser is wider than 12 inches, consider installing a secondary safety "pan" or mesh under the lid. This provides an extra layer of protection if the main lid is ever damaged or left unsecured, preventing accidental falls into the tank.
- Mark the Location with Landscaping: Even though the lid is at the surface, it can sometimes be overgrown by grass. Place a decorative rock or a small potted plant nearby so you—and your septic maintenance technician—can find it instantly during a storm or emergency.
- Check for "Float" Before Backfilling: After anchoring the base, give the riser a firm shake. If it moves at all, your anchors aren't deep enough. A loose riser will eventually shear the sealant, allowing dirt and roots to enter your tank, which can lead to a premature need for lift station pumping or baffle repairs.
Following these best practices ensures that your DIY project meets the same high standards we uphold at Blue Ribbon Septic, protecting your property and your peace of mind.
Managing Your Sacramento Septic Access with Confidence
Upgrading your system with a septic tank riser diy project is one of the smartest investments you can make for your property. You now understand how to locate your tank, create a watertight seal, and install a durable septic tank riser and lid that will save you time, money, and landscaping headaches for years to come. By bringing your access to the surface, you've removed the biggest barrier to consistent, proactive system care.
Taking this step today ensures that your septic system remains a forgotten utility rather than a sudden emergency. Whether you are looking to simplify your own maintenance or you're preparing your home for the Sacramento real estate market, professional-grade access is a standard you won't regret. If you find that your tank is buried too deep for a DIY approach, or if you simply want the peace of mind that comes with a guaranteed, watertight seal, we are here to help.
The team at Blue Ribbon Septic provides expert, honest septic riser and lid installation to ensure your system is always accessible and code-compliant without the stress of doing it yourself.
Common Questions About Septic Riser Installation
Can I install a septic tank riser myself?
Yes, septic tank riser diy projects are manageable for homeowners comfortable with basic tools and digging. The process involves uncovering the tank, cleaning the surface, and securing the riser with a watertight sealant. However, if your tank is deeper than four feet or shows signs of structural damage, it is safer to hire a professional for septic riser installation to ensure the seal remains airtight and the extension stays stable under soil pressure.
How much does it cost to install a septic tank riser?
The cost of a septic tank riser kit typically ranges from $100 to $300, depending on the diameter and height required. If you choose professional installation, labor costs in Sacramento usually add a few hundred dollars more. While there is an upfront cost, you save money over time by eliminating the "probing and digging" fees charged during every septic tank pumping or inspection visit.
What is the best material for a septic tank riser and lid?
Heavy-duty polyethylene or PVC are the industry standards for modern installing septic risers. Unlike concrete risers, which are extremely heavy and prone to cracking or leaking over time, plastic risers are lightweight, corrosion-resistant, and much easier to seal to the tank. Ensure your kit includes a reinforced, bolt-down lid with a gasket to prevent odors from escaping and surface water from entering.
Do septic risers need to be a certain height?
For the best results when installing septic tank riser components, the lid should sit approximately two inches above the final grade of your soil. This prevents rainwater from pooling on top of the lid and leaking into the system, while still being low enough to avoid becoming a major tripping hazard. Always measure the depth from the tank to the surface before purchasing your kit to ensure a perfect fit.


